Server Management Panel
Cpanel©
(Part II)
5.1.- Password Protect Directories
6.2- How to View Website Statistics using AWStats
8.2- How Do I Create and Delete a Subdomain?
5.1.- Password Protect Directories.-
In some cases it is necessary to protect directories with an username and a password to prevent access by unauthorized persons.
For example, all dynamic websites have a manager that is accessed, for example, www.yourdomain.com/admin and want to protect the /admin folder so that users can freely access www.yourdomain.com but a window will ask for username and password if they want to access www.yourdomain.com/admin.
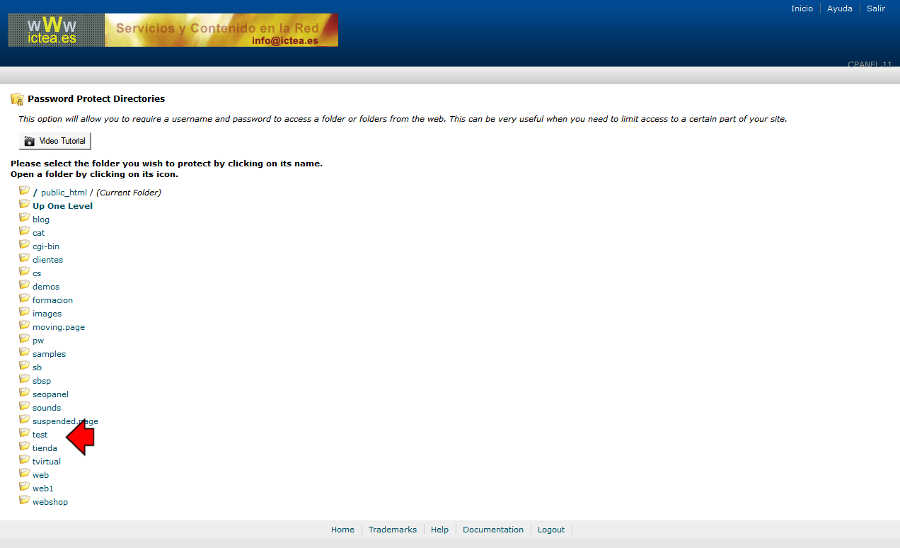
To do so log in cPanel and click on the first row (Password Protect Directories) in the block 'Security'.
A page appears with a list of all the domain directories. We press on which we want to protect (in our example 'test').
A page allowing us to protect that directory.
First check the box 'Passwod protect this directory'.
Fill in Name the protected directory field. This will be the message shown to visitors when they try to login and can be anything you like. (in our example 'Directory protected with password').
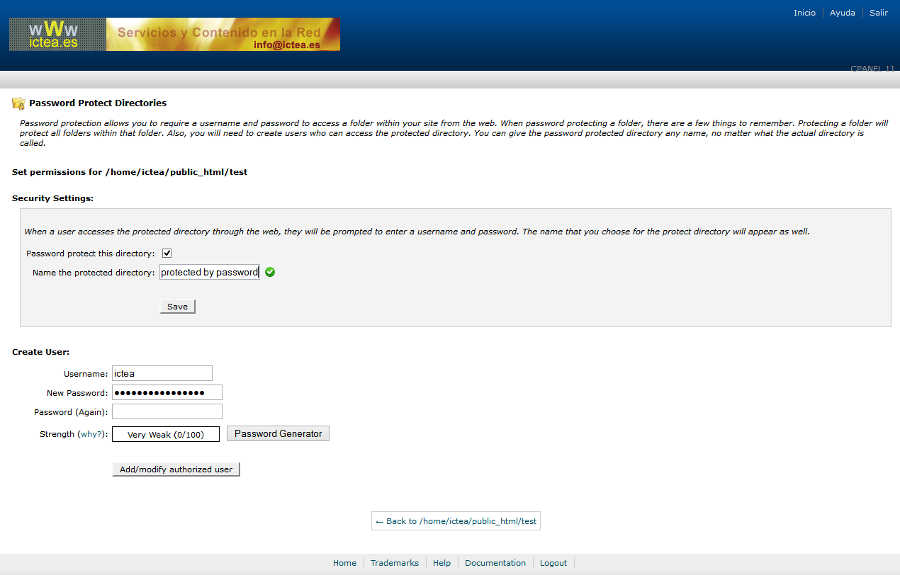
(NOTE.- It is bery important to check the box 'Passwod protect this directory' because otherwise the directory is not protected).
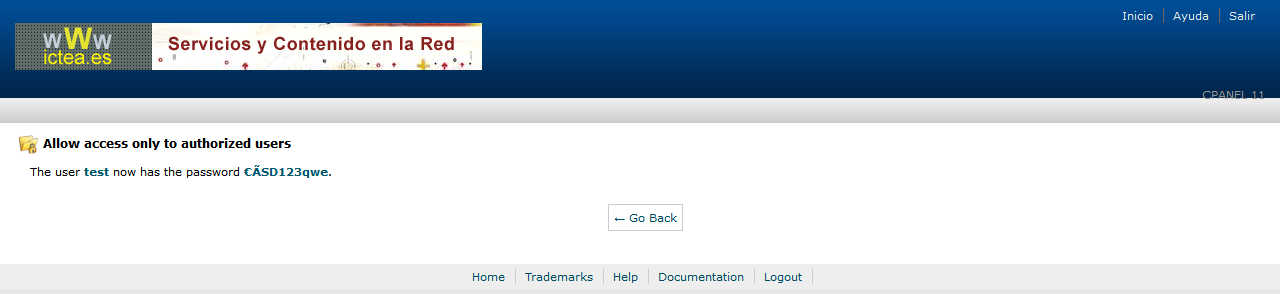
After clicking on 'Save' a confirmation appears.
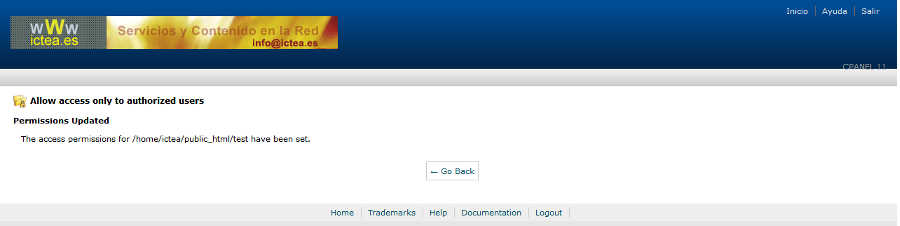
Click on 'Go Back' to define users allow to access the directory.
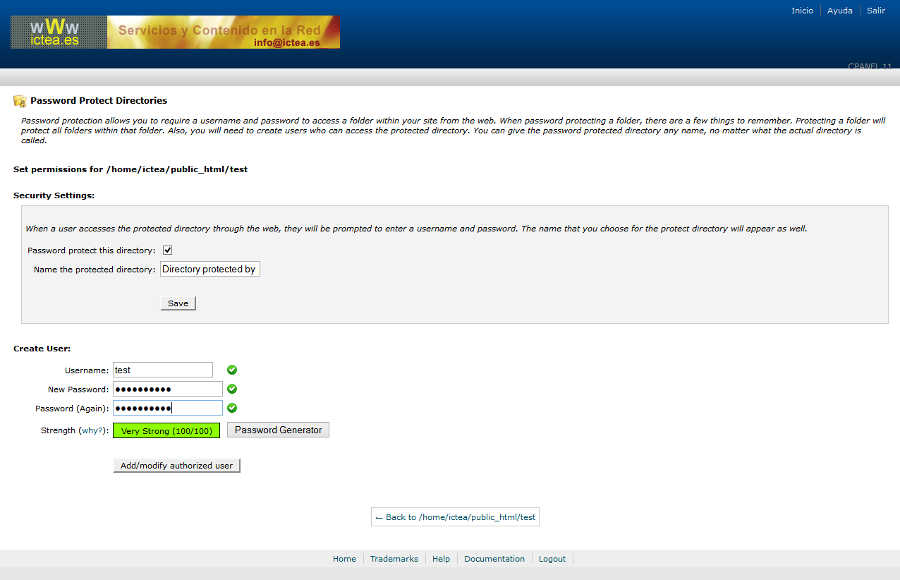
In the block 'Create User' and in the first box enter the username (test) and in the second box the password. Enter the password again in the third box.
After clicking on 'Add/modify authorized user' a confirmation appears.
Click 'Go Back'.
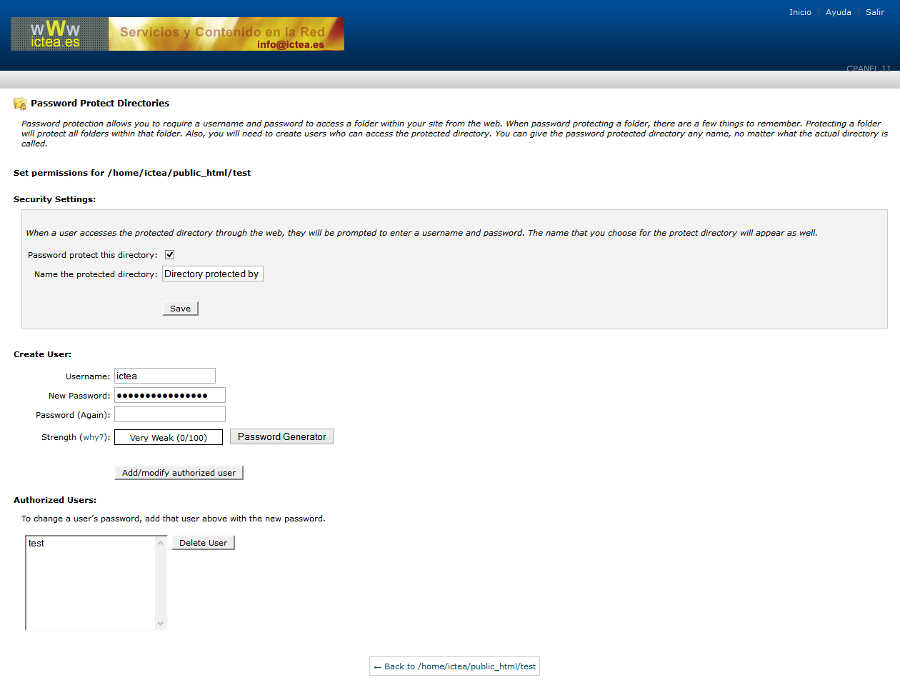
See that the user created to access the directory already appears (you can create all you want).
Now, if you try to access to http://www.ictea.com/test (o any URL below) a window (with the text 'The site says: "Directory password protected" that was the one entered) asks for the Username (test) and the Password set.
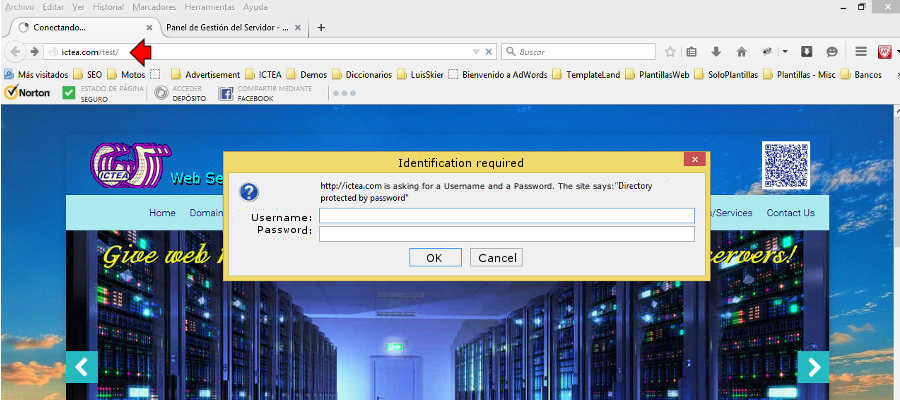
This is the proper way to check if a directory is password protected. If the browser prompts you to login, then the folder has been properly password protected.
| Warning! This password has a maximum of 8 characters. Any characters typed beyond the first 8 will not be required by visitors. |
404 Error When Using a URL with a Shared Server SSL
If you are accessing a password protected directory with a URL that includes the use of a shared server SSL (https://securexxx.hostgator.com/~<user>/<whatever>) and receiving a 404 error, this is because Apache is looking for a 401 page and serving a 404 when it is not found.
To resolve this, add a single line to the .htaccess file in the protected directory, to give Apache the 401 page it is looking for (ErrorDocument 401 "Authorization Required").
For information on how to add this line to your .haccess file, please read:
Hotlink protection prevents other websites from directly linking to files on your website. Other sites will still be able to link to any file type that you don’t specify (ie. html files).
An example of hotlinking would be using a <img> tag to display an image from your site from somewhere else on the net. The end result is that the other site is stealing your bandwidth. If you activate the Hotlink Protection, then that site will not steal your bandwidth.
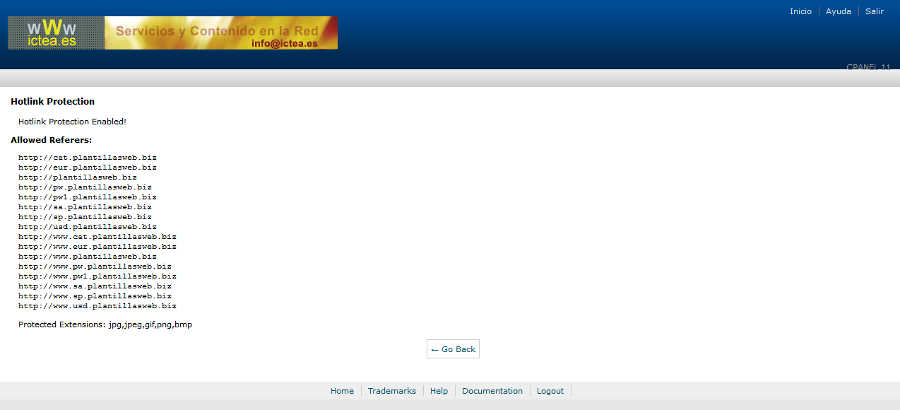
How to configure the Hotlink Protection.-
Log in cPanel and click on 'HotLink Protection' (third row in the block 'Security'). The homepage for 'Hotlink Protection' appears:
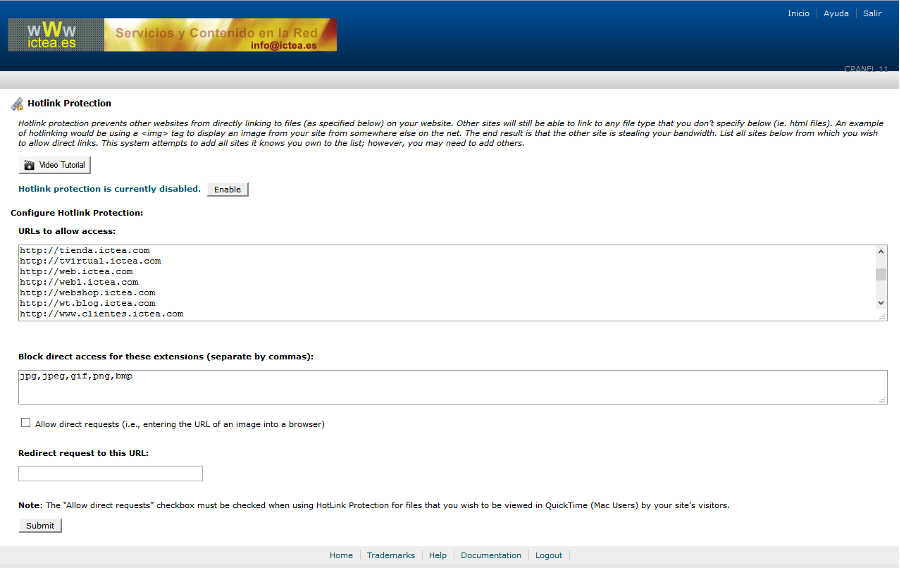
Here you can set the 'Hotlink Protection'.
Make sure the domain name you wish to protect is in the box called "URLs to allow access".
In the box called "Block direct access for these extensions", provide the extensions for which you would like to block.
We suggest you check the box for "Allow direct requests". Skip the "Redirect request to this URL" box and hit on the link 'Submit'.
A confirmation page appears:
You have now protected your images from being hot-linked. Just be sure that all of your additional domains are in the Hot Link list.
WARNING: If your images stop working, you may need to check your HTML source code for a common problem. Some website designers (or programs) may decide to use absolute path names for your images. That means, instead of a relative path like "/assets/img/pic.jpg", it will use the entire URL like "http://www.domain.com/assets/img/pic.jpg". You must have that exact protocol and domain name listed in your allowed URLs ("URLs to allow access"). If there is any slight difference in the protocol (http://) or in the domain name (domain.com/) between the allowed list and the HTML source code, then your images will be blocked.
NOTE: Some firewalls (such as Symantec's Norton Internet Security, and ZoneAlarm) will block a special referrer variable in order to add more privacy for the user. HotLink protection works with this variable to tell where the request is coming from. As such, HotLink isn't the best solution to avoid bandwidth theft as it will eventually block legitimate requests from visitors using one of those firewalls. Unfortunately this issue is not under our control and there's nothing we can do to prevent it from blocking legitimate visitors. Use it at your own risk.
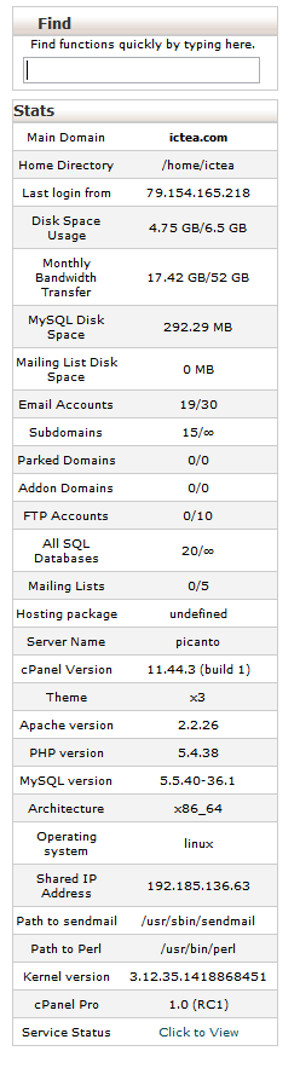
The server is recording in real time statistics both consumption of resources (use of disk space, data transfer, etc.) as visitors.
In the left column of the cPanel home page, you can see a summary of the statistics in this, for example, we can see in real time how much bandwidth we have consumed (Monthly Bandwdth Transfer) or the Usage of Disk Space.
La transferencia mensual de datos (ancho de banda) es el total de datos enviados o recibidos por el servidor( se puede asimilar al consumo eléctrico. Cuanta más potencia tengamos y cuanto más tiempo la tengamos activada, mayor será el consumo eléctrico).
La transferencia de datos es la suma de los enviados/recibidos por diversas fuentes: HTTP por las visitas recibidas en su web, ya que cada vez que una persona visita la página el servidor debe enviarle todos los ficheros que conforman dicha página, POP3 debido al correo que se envía, SMTP debido al correo que se recibe, FTP debido a los datos enviados/recibidos por este protocolo (normalmente cuando se está creando la página), y otros de menor influencia.
Aunque en la columna a la
6.2- How to View Website Statistics using AWStats.-
When you have a website online, you may want to keep track of how many people are visiting your site. cPanel offers several built-in statistic reports, and AWStats is one of the more popular programs. AWStats updates every 24 hours and also instantly when you click the Update now link.
The statistics report gives details about the amount of people coming to your website and other information such as:
- Monthly history
- Days of month
- Days of week
- Hours
- Countries (top 25)
- Hosts (top 25)
- Authenticated users (top 10)
- Robots/Spiders visitors (top 25)
- Visits duration
- Files types
- Pages-URL (top 25)
- Operating systems (top 10)
- Browsers (top 10)
- Connect to site from
- Search key phrases (top 10)
- Search keywords (top 25)
- HTTP error codes
Stats may not begin working and updating until after the first 24 hours.
Access AWStats
To access AWStats for your site:
- Log into cPanel.
- In the Logs section, click the AWStats icon.
- Click the view icon next to the domain name for which you wish to view stats.
For help understanding your AWStats results, please refer to the official AWStats website: AWStats Glossary.
Exclude an IP Address from AWStats
You can specify an IP address which you do not want logged in AWStats to keep your own page visits from being counted. This will allow you to view your site and make updates without affecting the daily statistics. To exclude your IP address:
- Visit hostgator.com/ip.shtml and copy IP address. This is your connecting IP.
- Log into cPanel.
- In the Files section, click the File Manager icon.
- Navigate above public_html and open the tmp folder.
- Open the awstats folder.
- Find the file named awstats.yourdomain.com.conf (yourdomain.com will be your actual domain name) and choose to Edit.
- Scroll down to the line starting with
and add your connecting IP inside the quotes. For example:SkipHosts SkipHosts="123.45.67.89" - Save the changes.
An FTP account is used for uploading and managing files on your website. An FTP account is automatically created in cPanel when you sign up for hosting, create a cPanel, create an addon domain or subdomain or enable anonymous FTP. So, by default, you already have an FTP account in your cPanel. Use your cPanel username and password to log into it.
You can create new FTP accounts to give access to other users without giving them your cPanel login credentials. For each additional FTP account created, you can also give each user different levels of access by assigning the user to a specific directory.
To create an FTP account:
- Log into cPanel
- In the Files section, click FTP Accounts.
- In the Login field, type the name of the FTP user. A full FTP user name will always be formatted as user@primarydomain.tld. You cannot create an FTP account without your domain name in it, regardless of the publish destination.
- In the Password fields, enter a password which will be used to authenticate this FTP account.
- Set a quota for the FTP account. Quota is the maximum amount of bandwidth the FTP user may use. If you leave the quota as unlimited, the FTP user will have the ability to use the total amount of bandwidth for the cPanel account.
- In the Directory field, cPanel will auto-populate an assumed directory based on the FTP username, but that is normally incorrect. So, we recommend erasing everything after public_html/and providing the directory you would like the user to access.
- If you erase everything and type a single "/", the user will have access to your home directory (anything outside of the public_html folder).
| Note: In this step, you can determine the level of access for a user. The FTP user will not be able to navigate outside of the specified directory; however, they will be able to access all files and subfolders inside that folder. |
- Click Create
It is not always necessary to register a new domain name when the one you already own will work perfectly fine. Rather than registering a new domain name, you can always create a subdomain using a domain you already own.
A subdomain is a second website, with its own unique content, but there is no new domain name. Instead, you use an existing domain name and change the www to another name. Let's suppose your domain is 'yourdamain.com' a sub-domain of your domain might be 'support.yourdomain.com'.
8.2- How Do I Create and Delete a Subdomain?-
To create a subdomain, please do the following:
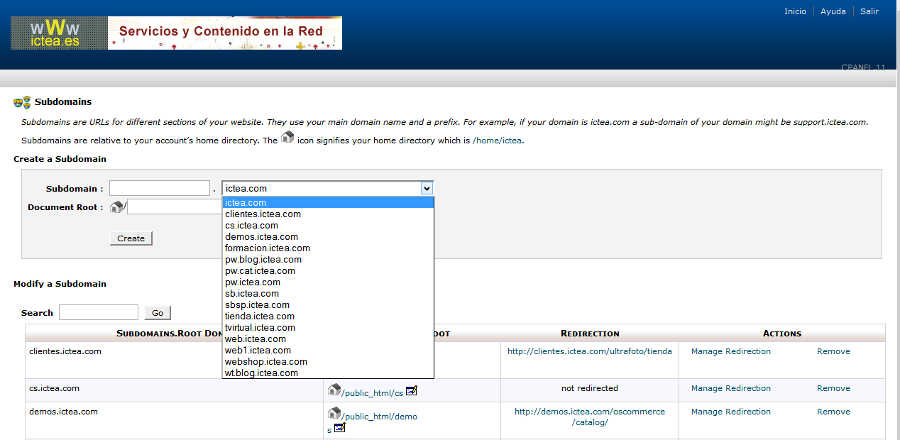
- Login to cPanel and click Subdomains (in the block 'Domains').
- In the drop-down, choose the domain (if you has not created any subdomain before the drop-down menu will show the only you have, i.e, 'yourdomain.com'. You can see in the image below we have created many subdomains before as 'pw.ictea.com' or 'pw.iblog.ctea.com').
- In the box before the domain, type the subdomain name you want.
- Click inside the "Document Root" box and it will auto-fill.
- Hit the Create button.
The icon ![]() indicates yuor home directory that will be /home/cpanelusername.
indicates yuor home directory that will be /home/cpanelusername.
To delete a subdomain, please do the following:
- Login to cPanel and click Subdomains (in the block 'Domains').
- At the bottom, under the column 'Actions', click Remove.
Redirects allow you to make a specific web page redirect to another page and display the contents of that page. This way you can make a page with a long URL accessible by a page which has a shorter and easier to remember URL.
How to Set Up a Redirect
- Log into cPanel.
- Under Domains, click the Redirects icon.
- From the Type drop-down menu, select which type of redirect is to be used.
- Permanent 301 is a redirect that will update the visitor's bookmarks and direct search engines to the new site.
- Temporary 302 is a redirect that will redirect the visitor or search engine but will not update the bookmark, and search engines will continue to index to the original page.
- From the "http://(www.)" drop-down menu, choose the domain name you would like to redirect.
- If you would like to redirect a single page or directory, you can use the adjacent text field to enter the name of the folder or file.
- In the "redirects to" field, enter the full URL of the page to which you will be redirecting.
| Note: You must enter the protocol (e.g. http://, https:// or ftp://) as well in order for the domain URL to be accepted. |
- Select one of the following www redirection options to dictate whether or not the domain will be redirecting:
- Only redirect with www. only redirects visitors that type www. as part of the URL.
- Redirect with or without www. redirects all visitors regardless of if they use www. or not.
- Do Not Redirect www. will not redirect visitors that use www. as part of the URL.
- Clicking the Wild Card Redirect option allows users to set up a redirect to the same file on a new destination.
- With Wild Card Redirect, www.example.com/about.html will redirect to www.example-destination.com/about.html
- Without Wild Card Redirect, www.example.com/about.html will redirect to www.example-destination.com
- Click Add to create the redirect as specified.
Now when visitors type the exact URL that you specified, they will be redirected to the target site you assigned.
If you ever encounter problems with the way your server handles PHP packages, it may be helpful to view and/or modify your server's PHP configuration. For example, if your site uses an older script that is incompatible with a newer PHP version, you may want to configure the site to use an older version of PHP; otherwise, you should be sure that your site's scripts are updated to the latest version available to avoid any issues with PHP updates.
-
Update PHP Version for a Site
The PHP Configuration Plugin in cPanel allows users to easily enable a specific PHP version for a site without having to manually add a handler to the .htaccess file.
To update the PHP version for a site:
1. Log into cPanel
2. In the Advanced section, click on the PHP Configuration icon.
3. Navigate to the directory for which you'd like to update the PHP version.
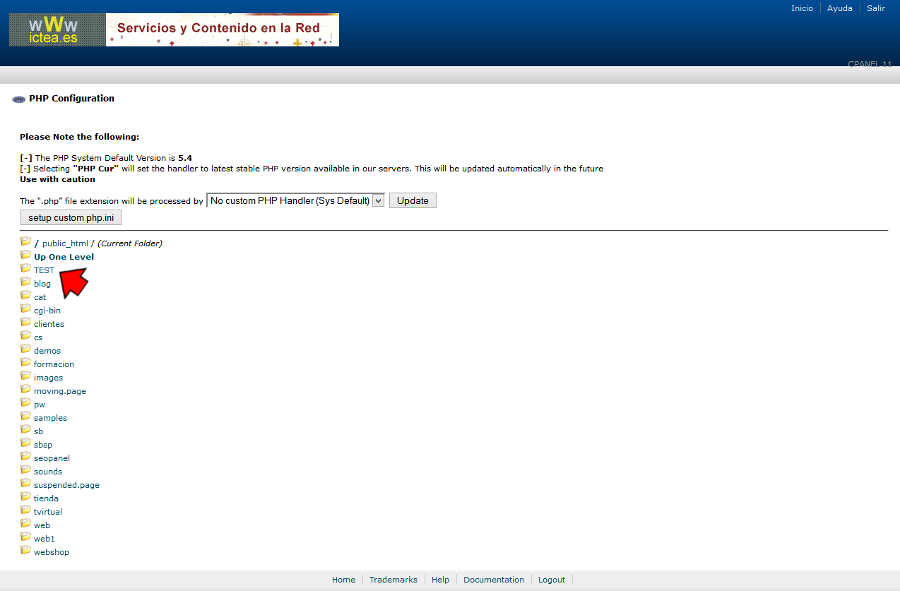
4. From the drop-down menu, select a specific version of PHP or one of the following options:
-
- No custom PHP Handler (Sys Default) - This option will process the .php file extension using the server default, which is not necessarily the latest version of PHP. (The PHP System Default is displayed at the top of the plugin page.
- PHP Cur - This option will automatically process the .phpfile extension using the latest stable version of PHP on the server.
Caution: If your site's scripts rely on older functions of PHP which are no longer available in the latest stable version being used on the server, you may encounter compatibility issues when PHP Cur is automatically updated.
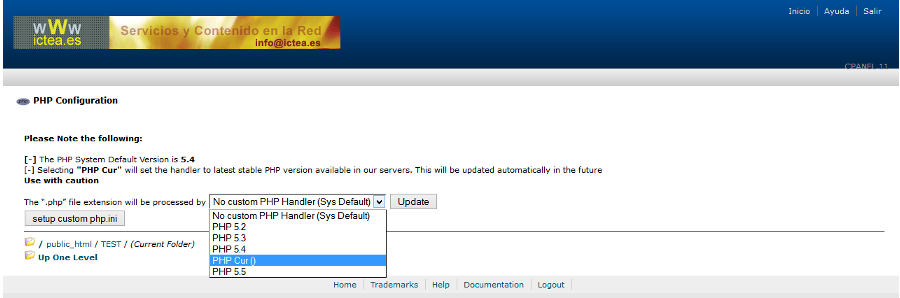
5. Click Update.
When using the PHP Configuration plugin, updates are applied recursively. This means any update you apply to a directory will also apply to all sub-directories, unless you apply a different directive to one of those sub-directories. Therefore, to use a different PHP version for an addon domain, you would need to navigate to the document root for the addon domain and select the appropriate version of PHP.
